Premium and discount zones – explained like you’re five
Like many things in Smart Money Concept trading … premium and discount zones are very basic concepts that get wrapped up in a lot of complicated jargon.
If you understand the idea of getting into or out of the market at a ‘good price’ – you understand what premium and discount zones are all about.
A good setup at a bad price
Many of us get so focused in on the all-important ‘setup’ that we fail to ask a crucial question: Given the move I’m trading, am I buying relatively cheaply or selling relatively expensively?
It sounds obvious. But is so easily forgotten in the web of analysis we put around our strategies.
Even the best-looking setup can make a poor trade if we’re entering at a bad price. If we’re putting money at risk, we want enough room for a worthwhile profit target – and a decent reward for that risk.
This is where premium and discount zones come in. They provide an additional filter for deciding whether an entry is worth considering.
Premium and discount zones: the ridiculously simple version
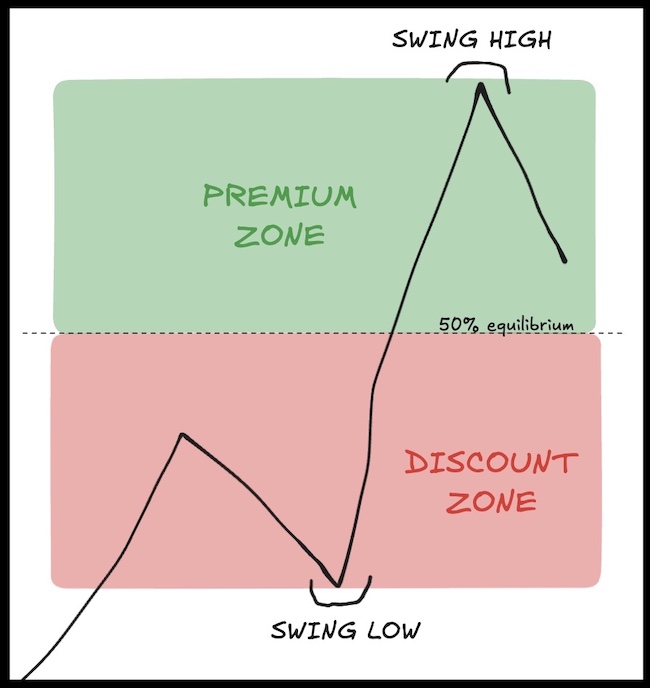
Take a meaningful price move with a swing low and swing high. Split it in half.
The top half = premium The bottom half = discount
If you’re looking to buy, you want to do it in the discount half.
If you’re looking to sell, you want to do it in the premium half.
Buy low, sell high – It really is that simple.
Bias … zone … setup …
As the name indicates – these are ‘zones’ not signals. Premium and discount refer to locations on our charts. Generally, if we’re looking to enter a trend, we’ll wait for a pullback – this just draws a line that we need that pullback to swing into.
If you want a checklist for your entry, it would look something like this:
Look for the directional bias (eg higher highs and higher lows for a bullish bias)
If bias is bullish, wait for a pullback into the discount zone.
Now look for setups.
The tricky bit …
Okay, so far, so simple.
What can go wrong with plotting a premium and discount zone?
Picking out the external and internal structures for SMC trading can be tricky. Charts are full of highs and lows – you can make almost any price look simultaneously cheap and expensive. So, which are meaningful structures around which to locate our premium and discount zones?
Think about the kind of move you’re looking to trade, and zoom out so you’re looking at the price structure that matches that. I appreciate, that sounds a little vague. It will take some practice, and it will be subjective.
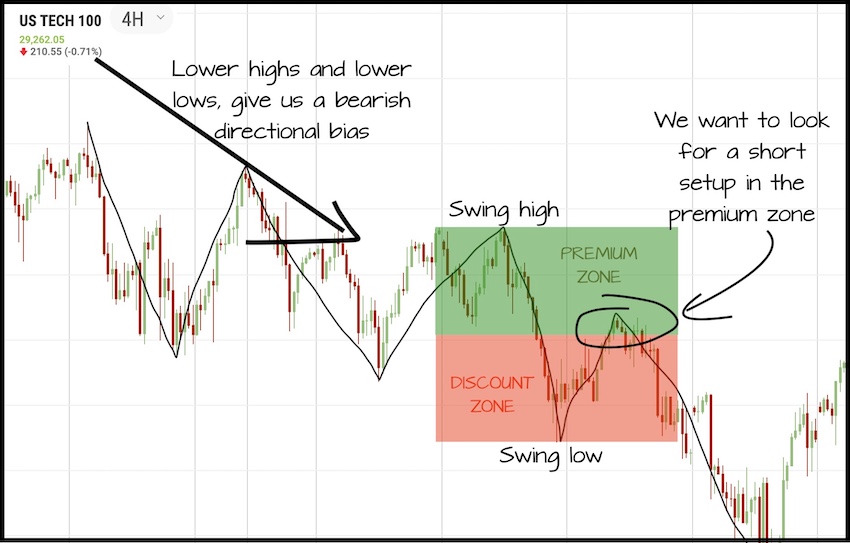
Here we have a 4-hourly chart on US Tech, with a clear downtrend, in the form of lower highs and lower lows.
We can see on the swing high and swing low, there are smaller swings within those moves, but by looking at a relatively long timeframe, we can see a bigger picture.
Marking up the swing high/swing low, and then the 50% midpoint, we can clearly see our premium and discount zones.
Only now do we zoom in …
Adding the Fair Value Gap
Here’s an example of how we combine this with the SMC structures we’ve learned already …
Remember, a Fair Value Gap is a 3-candle pattern in which there’s no overlap between candles 1 and 3.
And a Break of Structure occurs when price breaks through a significant previous swing low in a downtrend, or a previous swing high in an uptrend.
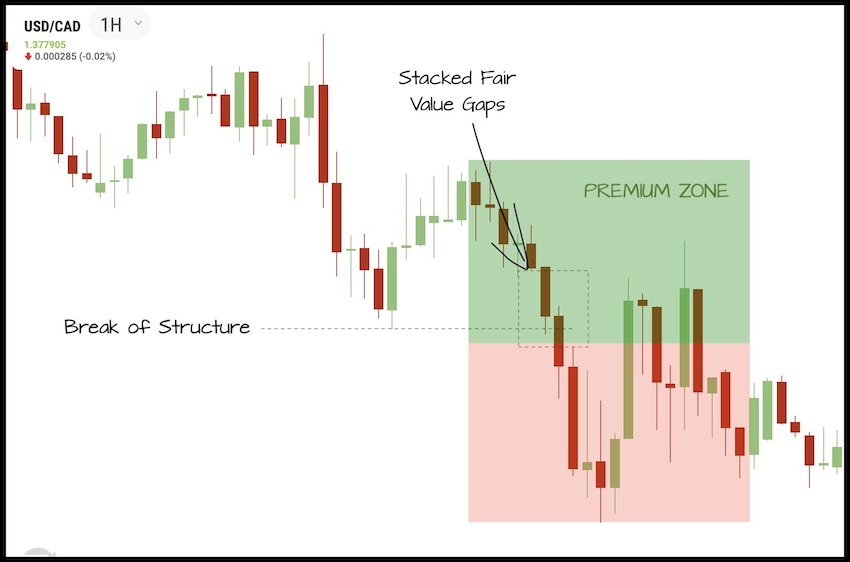
In the example below, we have a bearish bias, and a break of structure downwards. The strong move that creates that break also leaves behind stacked Fair Value Gaps.
When we then mark up our high/low, the upper 50% of that move becomes our premium zone. This is where price is considered relatively expensive, and where we want to look for our short opportunities.
The price moves into this zone and trades back through the FVG (touching its upper border), before turning lower, giving us the bearish setup we’ve been waiting for.
(I haven’t included the volume profile on this chart, but would recommend adding that, to look for a drop-off in volume around that FVG.)
How premium and discount zones turbo charge our reward-risk
Waiting for a retracement can give us the best entry in trend-following markets.
It gets you closer to the area where your setup would be invalidated (i.e. the market direction changing). That may sound like a bad idea, but it’s positive, because it means we can have a nice tight stop level.
And, it means we have more potential upside. A tight stop and wider profit targets give us nice reward-to-risk ratios.
By using a premium/discount zone, we’re systematizing this process, and giving ourselves clear rules about how much of a retracement is good enough. It’s a disciplined way of saying that you like the setup, but you don’t yet like the price.
Putting it all together
Let’s go back to that checklist: bias … zone … setup …
This is how we find good trades at the right price levels. Whatever you think about the ‘smart money’ label, the logic is pretty solid.
Premium and discount do not automatically mean that these are good places to sell or buy – prices can stay over or under priced for lengthy periods, so this isn’t enough to enter the markets.
Look for the directional bias – which way is the market trending?
Pick your swing high/low – if this isn’t clear, be patient. In a strong trend, there will be multiple opportunities.
Split the range at 50%: premium above, discount below.
Wait for price to move into the ‘zone’ (premium for shorts, discount for a longs).
Now look for the setup: zoom in and use volume profiles, FVG, order blocks – whatever entry technique you’re employing.
These steps allow us to apply Smart Money Concepts to our setups without a lot of the fuss and jargon. None of this is rocket science. Premium and discount zones simply give us one more reason to be patient – waiting not only for the right setup, but for the right setup at the right price.
Bias … zone … setup.
Keep those three things in the right order and you’ve got most of what you need.